Anyone interested in air sealing their home is going to notice sooner or later that their thermal envelope is regularly punctured by electrical stuff: light fixtures, switches, and receptacles (outlets). All of these things, collectively called “devices,” are powered by wires running through your walls, ceilings, and floors. The wires exit those walls, ceilings, or floors at each device—requiring some sort of hole at each location. And if those holes are in your thermal envelope, you’re going to want to air seal them.
The gaps created by these electrical devices aren’t always big, but there are a lot of them in a typical home. Furthermore, these gaps are often in critical locations around the house, such as at your uppermost ceilings. If you’ve set out to start tightening your ceiling plane—typically the best place to start air sealing—you’re probably going to need to air seal at least a few electrical penetrations for light fixtures, pretty much right away.
But you don’t need me to tell you that electricity can be dangerous. And particularly in old homes, you need to be careful that you know what you’re dealing with before you whip out the caulk gun. So let’s start with a quick guide to the types of situations you might encounter behind your light fixture or switch/receptacle cover plate. Knowing what you’re looking at will help you decide 1) whether it’s safe to air seal that location and 2) whether you might want to update your wiring in that location first.
Finally, a quick note: this article does not apply to recessed “can” lights, which you can identify by the fact that the housing goes up into your ceiling, and the bulb itself is roughly at ceiling level. That type of fixture is installed differently, takes special considerations when it comes to air sealing and insulating, and—most importantly—doesn’t usually have an electrical box (at least in the same way that your other electrical devices do).
Identifying Your Wiring
Even if you’ve never done any electrical work, have you ever unscrewed the cover plate of a switch or receptacle when painting a room? While you never quite know what you’ll find when you remove a cover plate in an old home, you’re mostly likely to encounter a few types of copper wiring (the photos below have the devices removed so that you can see the wiring better):
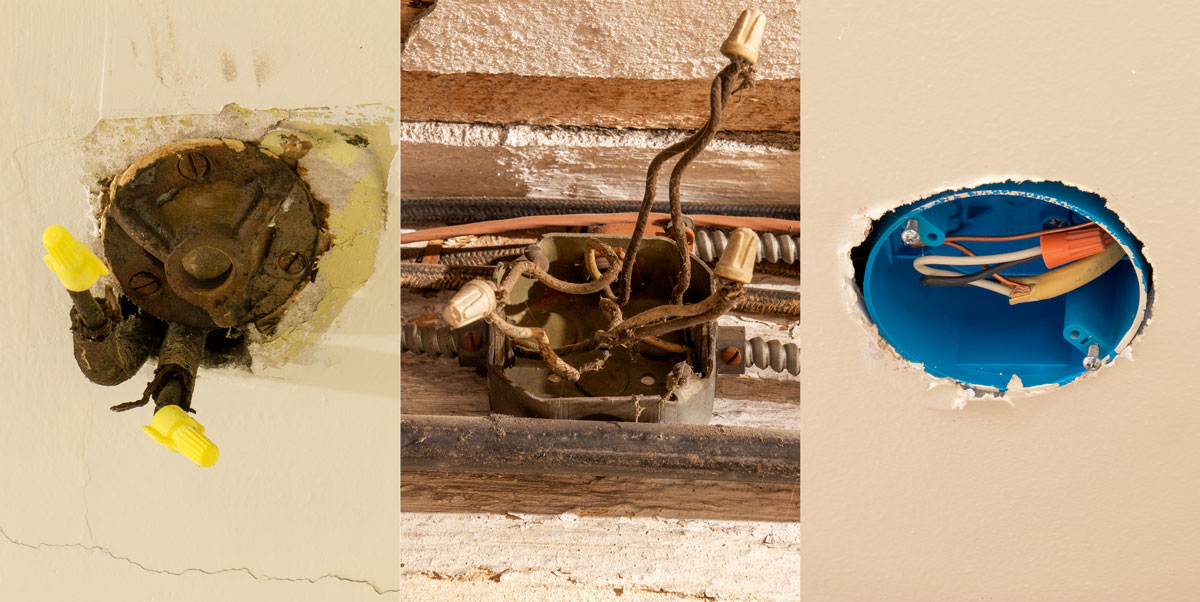
On the left is an example of the oldest type of wiring you’ll encounter: knob-and-tube. In the middle is an example of newer BX or Greenfield cable, and on the right is an example of modern Romex NM cable. If you see something that doesn’t look like any of the examples in the photographs, check out the extremely comprehensive guide over at InspectAPedia.
- Knob-and-tube wiring features rubberized cloth insulation, often wrapped in a secondary thicker fabric sleeve (or “loom”) near devices. Knob and tube is identifiable by the fact that each wire comes out of the wall separately instead of bundled together. K&T was introduced in the 1880s and was commonly used into the mid-20th century. There’s a lot of bad information about knob-and-tube wiring out there, and an honest electrician will often tell you that it’s safer than you probably think. However, you will probably be limited in how much you can safely air seal openings for devices wired with knob-and-tube.
- AC, BX, or Greenfield cable features a pair of wires bundled in a metallic sheath (if the cable contains a third green or bare ground wire, that’s called “MC” cable and is more modern). The wires are un-bundled as they enter your junction box; you won’t see the metal sheath in your box, but you’ll see a circular connector where the sheath attaches. AC (Armored Cable) was introduced around the turn of the last century; in the oldest types, the individual wires were insulated with rubber or cloth as in the photograph above. Later, plastics were used.
- NM or Romex cable has been around in more or less its modern form since the 1960s. Similar to AC, it features a set of wires bundled together—only in this case in a plastic (Non-Metallic) sleeve. You can usually see the plastic sheath enter your box before the wires split, as in the photo above. You might also have earlier types of NM cable in your house that use a woven fabric sleeve. (If you look closely, you can see examples in the background of the middle photo.)
Finally, a word about junction boxes themselves. Notice how the wiring in the second and third photos (AC and Romex) enter an enclosed box, and the knob and tube in the first photo does not. (The metal ring in the photo is a mounting bracket for a light fixture, and it’s screwed directly to a wood joist.) Junction boxes (also known as electrical boxes, switch boxes, ceiling boxes, etc.) are designed to be a safe place for connections—junctions—between wires to take place. That way if you have a loose connection or a short that results in a spark or an arc, the problem is safely contained within the box.
Knob-and-tube wiring often didn’t use junction boxes, which was normal at the time it was installed. (The system also used soldered connections, which were less likely to become loose.) However, you’ll sometimes find newer wiring types installed without junction boxes because of ignorance or laziness. In any case, I can’t recommend air sealing any openings for devices (lights, switches, or receptacles) that don’t contain junction boxes.
If you do, you’re starting with an already less-than-ideal situation… then trying to make it airtight and introducing flammable sealants! To top it off, the opening will probably be too big to seal without a junction box. The good news is, you can often add a box—even for knob and tube installations. The junction box will both make your connections safer and fill up most of the big hole you’re trying to seal.
So Should I Air Seal My Electrical Box?
All the advice out there about air sealing electrical boxes seems to assume that you’re dealing with new construction—or at least properly wired, modern Romex cable in correctly installed junction boxes. However, every time I remove a cover plate or light fixture in my old home, I find something I don’t like: nicked insulation, an overstuffed junction box (if one exists at all), or improper connections. There are just too many variables for me to be able to tell you what’s safe, so ultimately—as always—you’re going to have to use your best judgment. Or talk to a trusted electrician!
That said, I’ve attempted to put together a list of scenarios to think through:
- Do you have a junction box at all? If not, you shouldn’t air seal unless you can safely install one, as discussed above.
- Do you have modern Romex (NM) or MC cable with a ground (bare or green) wire? If so, and the wire and junction box are properly sized (which is too big of a subject for this article)—and everything’s in good condition—you are in the best possible position to air seal. Not only is it safe to air seal the box, but there is no reason to replace this wiring for any other purposes beforehand.
- Do you have NM or AC cable in good condition but without a ground wire? If so, think about whether you want to pull new grounded cable before air sealing. Lots of old homes have ungrounded circuits, and air sealing won’t make the wiring too much more difficult to change later. But on the other hand, it sometimes doesn’t take too much effort to make this safety upgrade. (Grounding won’t really help you unless you can get the ground wire all the way back to your electrical panel, but you can always pull new short runs now and connect them all the way back to the panel later.)
- Do you have aluminum NM cable? If you see aluminum wires rather than copper, you should really look into replacing those runs before air sealing. After a period of popularity in the 1960s, aluminum was found to frequently overheat at connections due to its material properties. While I could go either way regarding replacing ungrounded cable, I personally would replace aluminum NM cable before air sealing if at all possible. (It’s not that air sealing will necessarily make this wiring less safe, but rather that you have identified an existing potential safety concern.)
- Do you have NM or AC cable with cloth insulation? Woven cloth insulation can become frayed or brittle over time, as in the middle photo above. The insulation on the individual wires is more important than the woven sheath around a whole bundle as in early NM cable. If you see fraying or cracks in the insulation of individual wires, don’t air seal anything involving that wiring until you replace it (again, not because air sealing will create a new problem, but because you’ve discovered an existing one). If you have individual wires with cloth insulation that looks to be in good condition—keeping in mind that you can’t see the whole run—I might still take the time to replace it, if feasible, prior to air sealing. If it’s the sheathing itself that’s woven, and there’s no evidence of deterioration, I personally would go ahead and air seal.
- Do you have knob-and-tube wiring? Knob and tube can be much more difficult to replace than the other types of wiring because of the way it’s installed. It’s worth thinking about doing, but there’s a good chance a previous owner of your house already replaced the easy stuff in your basement or attic and left you only the difficult runs in between. (Though fortunately, attics and basements are the most critical for air sealing!) If you’re stuck with K&T and have, or can safely add, a plastic junction box, you can at least air seal the perimeter of the box. I personally would also be comfortable air sealing the gaps and penetrations inside the box in low-load, low-temperature applications such as switches and receptacles. I personally would not seal those gaps above, say, a flush-mounted light fixture that will generate significant heat (due to the potential to break down the insulating material).
Note the extensive use of “I personally” in the above—unfortunately, neither the National Electrical Code (NFPA 70) or the International Energy Conservation Code (IECC) provides any guidance on safely air sealing old wiring in existing residences. If any reader is aware of a relevant codes, guidelines, or professional standards, please leave a comment or contact Green Old Home.
Finally, of course, if you see anything that you don’t understand or that makes you uncomfortable—call an electrician you trust before proceeding. But I do strongly encourage you to address any electrical issues rather than allow them to prevent you from air sealing indefinitely.
Alright, enough safety talk. Now that you know what you’re looking at, let’s get into how to actually air seal your electrical boxes.