This article explains how to safely air seal electrical boxes to tighten your home’s thermal envelope. Electrical penetrations are often responsible for holes in the most critical locations in your envelope, making them a prime target when your goal is to air seal your home. However, particularly if you own a home with old wiring, it’s important for you to first make sure that it’s safe for you to start this project. If you’ve landed here without reading part one of this article, which will help you to understand what you’re looking at inside your electrical boxes, check that out first before proceeding.
(There are even more safety considerations in this article, which made it run a little long, but I didn’t want to cut the info out and put it somewhere you might not see it. Please do take a few minutes to read to make sure you’re doing this work safely.)
Where are the Holes in Electrical Boxes?
As always, let’s start with the goal in mind.
Your ceiling light fixtures, wall switches, and receptacles (outlets) are all mounted to electrical boxes—also known as ceiling boxes, junction boxes, switch boxes, etc.—which provide a safe enclosure for electrical connections to take place. (Don’t have a junction box behind your electrical device? Don’t air seal until you add one!)
There a many types of electrical boxes, but what’s relevant here is that they’re all full of holes. Even more importantly, they almost always have a sizable gap around their perimeter—that is, between the box and your plaster, drywall, or wood finishes. Your goal is to seal the big gap around the perimeter, and fill all the little holes in the box if possible.
Let’s take a look at a couple of examples:
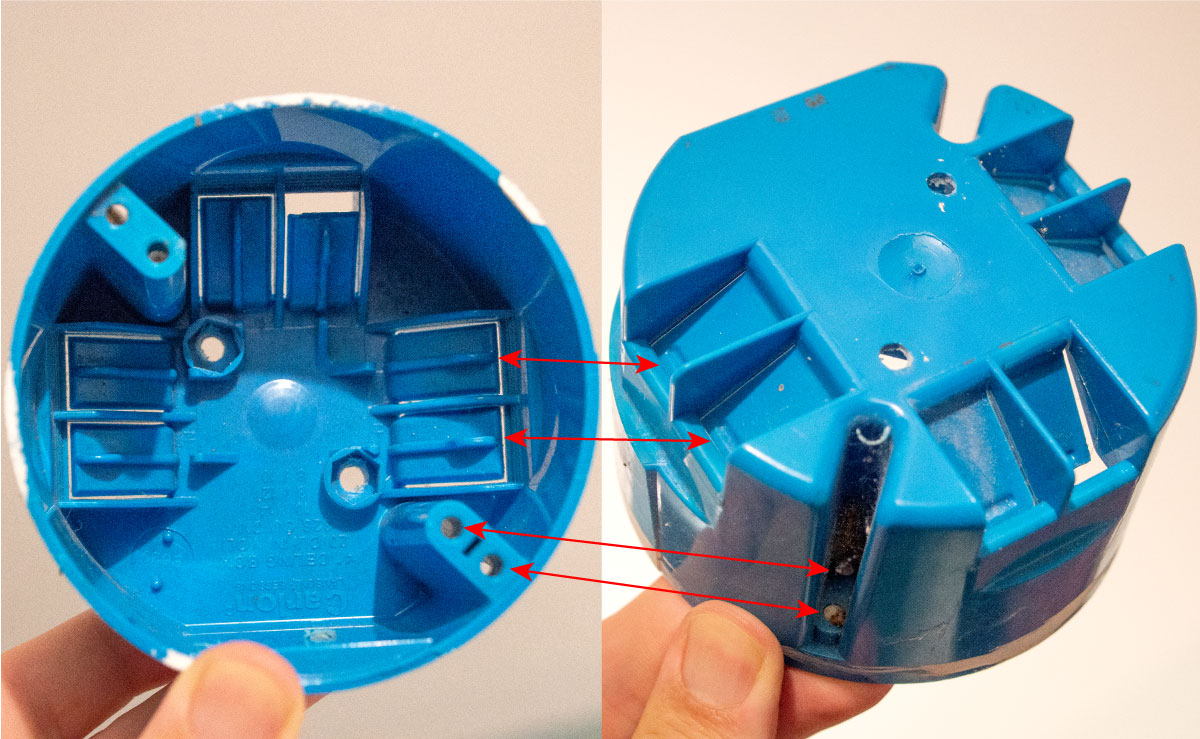
The photos above show a typical plastic 4″ ceiling box, the kind you might have above a light fixture or ceiling fan. (You might have a circular or octagonal metal box, instead—see the next example for a metal box.) On the left is what the box would look like if you were sealing it from the room below (without any wires or mounting screws in it). On the right is what the box would look like if you’re sealing it from above, if you have attic access (again, with no wires or mounting screws). I’ve added a few arrows to help orient you to corresponding parts.
The big circular holes you see in the center of the box are for mounting it to a joist or hanger, while the smaller holes at the outside are for mounting a fixture to the box. Some of these holes will be filled with screws and you won’t need to air seal them. The six tabs you see around the outside are where the wires get pushed in. Normally only one or two of these are going to be used in any given situation. As you can see, with no wires you have a small gap a little under 1/16″ wide around each tab. When you push a wire in, the gap increases as you can see in the tab at the top of the left photo, though obviously the wire will fill some of it.
My math says all those little holes inside add up to about 0.5 square inches off the bat, plus more when you push wires through. Then of course there’s the big gap around the perimeter of the box. If your contractor was pretty careful and left only a 1/8″ gap around the 4″ perimeter, that’s still about a 1.5 square-inch hole… and I bet if you check, your gap is bigger than that. So it all adds up to a hole of at least 2 square inches per box.
Let’s check out another example:
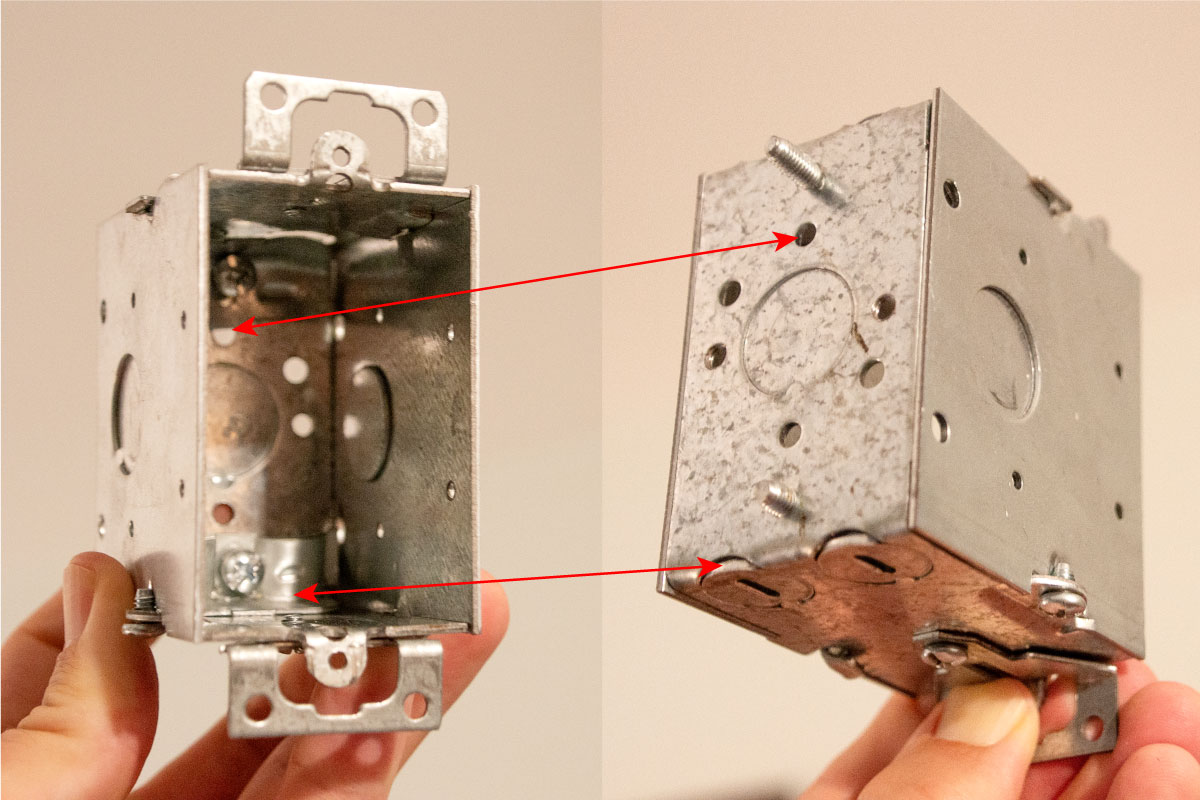
The photos above show a metal box that you might find behind a wall switch or receptacle (you might have a plastic version of this instead, which will have similarities to the previous example). Two major things can vary about this type of box: how they mount to the wall (this one has “ears” at the top and bottom) and the types of connectors they have inside to accommodate different types of wire (this one is for AC/BX/MC metal cable.) But otherwise they’re pretty much all the same.
You’re much less likely than with a ceiling box to be sealing one of these from the rear, but I’ve included both views to give you a sense of what you’re looking at. A key thing to understand about metal boxes (including metal ceiling boxes) is knockouts. See all the circular perforations in the box that aren’t quite holes? Those are designed to quickly become holes if you need them to be, by banging on them. They serve various purposes, but the arrow at the bottom right shows a knockout that you would remove in order to feed cable into the box. In the photo at left, you can see the screw clamp you use to tighten the cable in place once it’s been fed.
I personally only seal the edges of knockouts if I can see daylight through them—for example, I’d seal the bottom knockouts on this box and not the ones on the sides or rear. Other than knockouts, you’ve basically just got a bunch of holes for screws, typically way more than in a plastic box. The vast majority of those won’t be used for screws, so that makes them targets for air sealing.
My math says the holes inside this particular box add up to a little over 0.6 square inches—before you knock out any holes for wires. And if you want to get really picky about it, you’ll notice that metal boxes are assembled out of several pieces—in this case a C-shaped center piece and two flat side pieces. Obviously this results in seams where the pieces come together. I didn’t count these seams or perimeters of the knockouts in my math, because they contribute a very small amount towards the overall air leakage. (But you can probably see that there’s a case to be made for using plastic junction boxes, when possible, when you take air sealing into consideration.)
Anyway, this is all before you factor in the perimeter of the box, which for this box will add another 1.25 square inches if you’ve got an 1/8″ gap. If you’ve got a bigger box that has multiple switches in it (called a double-gang or triple-gang box), obviously all these numbers are going to be higher. Again, it all adds up to a hole of about 2 square inches per box—minimum.
Air Sealing Safely around Electricity
Air sealing electric boxes isn’t super hard to do, but it can take some time to do it safely. Especially if you can only seal your boxes from the inside face with all the wiring in the way, you’ll need to take some basic precautions—but I’d recommend following all of these steps no matter your circumstances.
You know how your house has valves in its plumbing to allow you to shut off water? There’s usually a local valve right where it comes into your sink or bathtub, and then at least one master shutoff valve where your water line comes into your house. The electrical equivalent to your water valves is your electrical panel (also called a breaker box, or if your wiring is old enough, a fuse box.) Your house might have more than one, but there should be a main panel somewhere, which is the best place to start your search.
Inside your panel you’ll see row of switches—breakers—or fuses, each of which controls an individual circuit in your house. (Each circuit can consistent of anywhere from one device like a refrigerator, to dozens of lights.) To be as safe as possible, you should find the breaker responsible for the circuit you’re going to be air sealing, and switch it off.*
Note: If you open your breaker box door and the inside cover is missing (exposing all the wiring) inside, you need to be very careful to touch only the plastic switches—or carefully reinstall the cover. (If you’re not completely comfortable doing that, hire someone else to.) If everything looks in order, you’re not doing anything risky by flipping your breaker switches. If you’ve got a fuse box instead, you’ll need to do some research into how to safely disconnect those circuits depending on your fuse type. My house only has one fuse box as a sub-panel, and I can disconnect the whole box with a switch—I don’t want to steer you wrong depending the specifics of your situation.
Anyway, there’s a very good chance that no one has ever labeled your breakers or fuses, so you may have to spend some time figuring out which breaker does what. If that’s the case, you should really spend some time now labeling each breaker as you try it and see which lights and receptacles stop working. This is much easier with a helper on the phone with you who can tell you what each breaker is shutting off. If you take the time to label everything now, you’ll thank yourself many times later.
As described in the steps below, even once you’ve flipped off the correct breaker, you’ll want to double-check with a voltage tester that the circuit you’re working on has been disconnected before you start working. If the tester beeps, you’ll want to triple-check that you disconnected everything—those testers are designed to be overly cautious and will sometimes give you false positives, which are a lot better than false negatives!
Once the power is disconnected to your circuit, other steps are technically unnecessary, but it’s good to have some redundancy because you’re a human being and have probably made mistakes before. That means if you’re using a ladder, make sure it’s wood or fiberglass and not metal. It also means wearing shoes with rubber soles.
It’s definitely beyond what I can cover in one article to give you a complete rundown on electrical safety, so as always, use your best judgment based on your experience and what you’re seeing in your own home. If anything makes you uncomfortable, call a trusted electrician. They may not air seal your outlets for you, but they should be able to create safe conditions for you to do it.
Heat Concerns When Air Sealing above Light Fixtures
A final consideration when air sealing boxes above certain types of light fixtures is heat buildup. In some ways, this is less of a concern than it used to be thanks to the LED bulbs that you should absolutely be using. Because they are much more efficient at producing light, LEDs run much cooler than traditional incandescent bulbs, which wasted tons of energy as heat and could run north of 250 °F (and that’s just on the outside—the filament itself would heat to around 4600 °F!).
On the other hand, LED fixtures are now available that are practically flat, and mount flush to your ceiling or wall, directly over an electrical box—putting the heat source much closer to your wiring than with many traditional bulb fixtures. Again, LED fixtures don’t run as hot as incandescents, but it’s still something to think about when choosing your materials.
Compared to a wall switch or receptacle that should be experiencing negligible amounts of heat under normal conditions, a ceiling box above a close-mounted LED fixture may be experiencing temperatures in the mid-100s °F. I’m not suggesting that there are safety concerns when air sealing in that temperature range, but rather that you’ll want to make sure you’re sealing in a way that’s durable under higher temperatures.
So how hot are we potentially talking about? Well, let’s read between the lines: most if not all new LED light fixtures have a label on them requiring that they be hooked up to “minimum 90 °C [194 °F] supply conductors”—that is, to wires with a service temperature rating of at least 194 °F. If your wiring is older than the mid-1980s, you likely don’t meet that criteria, but that’s a whole other subject. I bring this label up because it suggests that the expected temperature inside your electrical box with these flush-mount LEDs will be below 194 °F. How much below, we don’t know—I’m sure there’s a factor of safety built in there, but we can probably infer that 194 °F is a pretty safe upper limit.
So when it comes to choosing a product to air seal the holes above those fixtures, it makes sense to me to use products that are rated for well above that 194 °F number. The most common latex caulk has a service temperature maximum of just 180 °F—maybe OK, but why risk it? Spray foams, on the other hand, are usually rated to 240 °F—including the Fireblock product—which is certainly better. But why not use 100% silicone caulk instead, which has a maximum service temperature on the order of 400 °F? That should put any temperature your LED fixture is producing right in the comfortable middle of the caulk’s service temperature range. And as discussed below, caulk is easier to safely install in existing construction, making it a clear winner in my book.
On a related note, some sources will tell you to use a fire-resistant caulk in and around ceiling boxes. Be careful not to buy an intumescent fire caulk, which is not actually designed to regularly serve in high temperatures—rather, it’s designed to expand and slow the spread of fire under extreme circumstances. You may have a code requirement where you live to use certain fire-rated materials, but from the standpoint of withstanding temperatures output by typical light fixtures with modern bulbs, a standard 100% silicone caulk should be sufficient.
Finally, as mentioned in the first part of this article, none of the above applies to recessed “can” lights—which don’t typically have the kinds of electrical boxes we’re discussing in this article anyway.
Caulk vs. Spray Foam for Electrical Boxes
As discussed in the previous section, 100% silicone caulk is probably a more durable choice when sealing electrical boxes near light fixtures that will heat up the box you’re sealing. But what about for most of your other electrical boxes—the ones above hanging light fixtures, or for switches and receptacles? Are both products safe to use?
You may be wondering about the wisdom of having sealants inside your electrical boxes at all. What if something were to spark? Are caulk and sealant flammable? Well, yes, technically. But the good news is that both materials have a low “flame spread rate.” You can see for yourself what this means if you bring some cured caulk or foam outside and try to ignite it with a lighter—each material will ignite, but put itself out quickly when you remove the heat. So for a momentary condition like a short, you shouldn’t have anything to worry about. (For a longer condition like an arc, your best bet is protection with Arc-Fault Circuit Interrupters [AFCIs], a newer type of circuit breaker that is designed to detect arcs and shut things down before they get out of control. AFCIs are mandated for most uses in new construction. Arcs are scary and my understanding is that having a little sealant in your electrical boxes is the least of your concerns.)
Anyway, if both silicone caulk and spray foam are suitable from a safety standpoint in room-temperature applications, which is better for air sealing electrical boxes? For existing installations like the ones in your old home—you know, air sealing a box that already has wires in it—here’s how I’d break it down:
- Air sealing the holes inside an electrical box: silicone caulk, every time.
- Air sealing the gap around an electrical box: silicone caulk for gaps below 1/4″, or in high temps. Otherwise, spray foam.
Here’s why silicone is the clear choice for the insides of existing, wired boxes. The sizes of electrical boxes are dictated by code. The idea is to have a certain amount of space for certain numbers of wires and connections. You are not allowed to impede on that space by filling the box with other stuff—like spray foam. That mean that if you somehow manage to plug all those tiny holes with your spray foam straw, you’re going to need to cut all the expanded and cured foam out of the box later. With existing wiring in the box, this is a huge pain. Much easier to apply caulk and remove the excess with your fingers all at once and be done.
As for sealing the gap around the box, you can more or less use the logic described in the main article on caulk vs. spray foam for joints of different sizes.
What You’ll Need
Fortunately, you don’t need too much special equipment to air seal your electrical boxes. You’ll need the basic supplies for using caulk and maybe spray foam, as well as a few additional items for electrical safety (note that this list includes affiliate links).
For sealing the holes in all boxes, and the perimeter of boxes above close-mounted light fixtures or when the gap is less than 1/4″, you’ll need:
- Flat-head and Philips screwdrivers, or an 11-in-1 that will cover most small electrical projects.
- A contactless voltage tester (“hot stick”). You can also use a multimeter if you know how to do it safely.
- A headlamp will come in handy if you’re killing the power to the area you’re working in.
- Decent electrical tape in case you encounter any nicked wires.
- A good caulk gun.
- 100% silicone caulk for the holes in the box, and maybe its perimeter—see above on caulk vs. spray foam.
- Backer rod for higher-temperature perimeter gaps greater than 1/4″ wide.
- Something to cut the tube’s tip. Lots of people use a utility knife, but I use a pair of dykes.
- Something to pierce the caulk tube’s inner seal. A good caulk gun will have this, or you can use a long nail or piece of wire.
- Latex gloves. (These are on the expensive side, so try to take them off carefully and reuse them.)
- A large, stiff piece of scrap cardboard to wipe your fingers on.
- A small vacuum—there’s a good chance your older electrical boxes are full of dust and dirt. I recommend that every owner of an old home have a small HEPA vac.
- Rubber-soled shoes, since you’ll be working around electricity.
For sealing the perimeter of boxes with a gap bigger than 1/4″ that aren’t above close-mounted light fixtures, you’ll also need:
- A red can of spray foam.
- Extra PPE for spray foam: Safety glasses, long-sleeved clothes you don’t mind ruining, maybe a respirator with an organic vapor cartridge, maybe something to cover your hair.
- Rags or paper towels and a can of acetone (or traditional nail polish remover) for cleanup.
Finally, if you’re sealing a ceiling box from below, you’ll need a wood or fiberglass ladder.
How to Air Seal Electrical Boxes
The steps below should cover the broad strokes of just about any air sealing job around a ceiling, receptacle, or switch box. See the articles on good caulking technique and good spray foam technique for more info on the basics of using each sealant that aren’t included here.
And it bears repeating: if you open up your electrical box and see something that you don’t understand or makes you uncomfortable, call a trusted electrician to make it safe for you before proceeding.
Note that if you have access to the rear of your electrical box, such as when sealing ceiling boxes from the attic side, you can skip steps 5-9. And if you’ve decided that your wiring situation is too dodgy to completely seal the holes in the box, you can still almost certainly safely seal bigger gap at the perimeter—in which case just skip steps 6-9.
- Be prepared to have your devices disconnected for 24 hours. You’ll want to make sure your sealants are fully cured before reinstalling anything.
- Put on your rubber-soled shoes. Put on your headlamp if you’re about to kill power to where you’re working.
- Kill the power to the circuit you’re working on. As discussed above, the safest way to do this is at the breaker box.
- Double-check for current near the box using your contactless voltage tester. I usually check both before and after exposing the wiring. Proper technique (to ensure the tester is working) is to use the tester on a live circuit, then your dead circuit, and then a live circuit again. Don’t be surprised if you get a false positive—that’s your cue to triple-check that you shut off power to the correct circuit.
- Open up the electrical boxes you want to seal. As always when working with sealants, you’ll want to work in batches to minimize wasted material that cures on you—so get as many boxes ready as you can. You’ll need to use a flat-head screwdriver to remove most switch and receptacle covers. There are a million ways to remove lights, depending on the fixture—just try to figure out how it was installed, and don’t force anything.
- Make careful note of how everything is connected. You’ll want to put it back together the exact same way (unless of course you notice something concerning). Take a picture on your phone and/or or temporarily label your wires with electrical tape.
- Disconnect any devices. Use your screwdriver to remove the screws connecting wires to switches and receptacles. Light fixtures will usually have “tails” that are connected with wire nuts to your incoming wires. You just twist those nuts off. You might also have to loosen a green ground screw to disconnect your ground wire (bare or green colored).
- Carefully “unfold” the wires from the box to give yourself access to all those little holes. You may have as few as two or three wires, or you may have more that are connected to each other by more wire nuts. You may or may not have to disconnect those wire nuts to give you and your caulk gun access to the interior. As always, take careful note of all connections before you take anything apart.
- Before you start sealing, take a look at your insulation for any nicks. If you see any copper showing through, wrap the area in electrical tape—as long as the copper itself looks intact. (If the copper looks like it’s been cut, the fear is a loose connection at that point. Not necessarily hard to fix, but beyond the scope of this article. You should probably talk to an electrician.)
- Put on your latex gloves. You’re going to be relying heavily on your fingers due to the cramped conditions.
- Apply caulk to the holes in the box itself. It’s probably best if you can apply the caulk directly to the holes using the tip of the caulk gun, and then “tool” the caulk into the gap with your fingers—but honestly, this isn’t a situation where proper joint profiles are really possible. Ultimately, you’re going to be relying on your fingers to work the caulk into the holes, especially where wires are entering.
- Remove excess caulk with your fingers. Remember that you can’t have any substantial buildup of material within your electric box that impedes on its interior space. Make sure there’s enough caulk to make a solid seal over each hole and around the base of each wire as it enters, but no extra.
- Apply caulk or spray foam to the perimeter of the box. See discussion above about which to use. Use backer rod if required. Don’t forget to wear that extra PPE if you’re using spray foam.
- Wait 24 hours for everything to completely cure.
- Carefully reconnect your wiring and reinstall your devices. When you fold the wires back into place, you have to be careful you don’t tear the seals you just made where the wires enter the box. Try to hold the wires steady at the base where they enter and bend them at a different point so that you’re not prying on your seals. I will often get everything roughly back into position right after Step 12 while everything’s still “wet” to minimize how much things have to move later on. If you do ruin a seal, it’s not the end of the world. Just peel out the cured silicone and start the clock over.
- Turn your circuit back on.
Like most projects, the first time you air seal electrical boxes will take you three times longer than every time after that. And especially when working around electricity, you should always take the time to be careful. So maybe don’t try this for the first time at 8pm on a Tuesday.
After a quick learning curve, though, I think you’ll find that air sealing an electrical box is pretty quick and painless. As I mentioned at the top, early on you’ll probably find yourself sealing a lot of boxes in critical locations in your thermal envelope. But by the time you have those covered, I have a suspicion that it will start to just bother you to see a leaky box.
For that reason, any time you’ve got a device removed—say to change a light fixture, or to replace a faulty receptacle—I encourage you to take the opportunity to seal the box behind it. Especially if you’ve already got an open tube of caulk slowly curing on your shelf (and who doesn’t!), air sealing electrical boxes is great way to use up that extra material while chipping away at those energy bills.
*If you’re air sealing light fixtures that are operated by a switch, technically you can just keep the switch off and you don’t need to kill the whole circuit from the panel. But how certain are you of your house’s wiring? How sure are you that your husband won’t come into the room and flip on the switch while you’re working? I always recommend disconnecting the circuit at the breaker when air sealing.